Okta
See these official instructions for reference.
Create an integration, configure SAML & get the metadata URL
-
In the Admin Console, go to Applications > Applications.
-
Click Create App Integration.
-
Select SAML 2.0 as the Sign-in method.
-
Click Next.
-
Provide the general information for the integration and then click Next.
-
Provide the necessary SAML settings information for your integration:
|
Field |
Value |
|
Single sign-on URL |
Sandbox: Production: |
|
Audience URI (SP Entity ID) |
Sandbox: Production: |
|
Default RelayState |
Leave empty |
|
Name ID format |
Keep default |
|
Application username format |
TranslationOS SSO requires a value equivalent to the user’s email address, as the domain is used to identify users. |
|
Update application username on |
Keep default |
Populate the attribute statements as follows:
|
Name |
Name format |
Value |
|
|
Unspecified |
user.email |
|
givenname |
Unspecified |
user.firstName |
|
lastname |
Unspecified |
user.lastName |
|
name |
Unspecified |
user.displayName |
-
Click Next.
-
Provide configuration information about your app integration to Okta.
-
Select I'm an Okta customer adding an internal app.
-
Select It's required to contact the vendor to enable SAML. Fill in the provided fields to help the Okta support team understand your SAML configuration.
-
Click Finish. Your integration is created in your Okta org. You can modify your integration's parameters and assign it to users.
-
-
After you create your SAML app integration, the SAML Signing Certificates section appears on the Sign On tab. Switch to the Sign On tab and navigate to the SAML Signing Certificates section.
-
Click the Actions drop-down alongside the relevant certificate.
-
Choose View IdP metadata.
-
Copy the metadata URL.
Send information to Translated
Send the following to Translated:
-
The metadata URL.
We will do some configuration on our end, then let you know when you can continue.
Enable the app for your users
Follow these instructions.
Log in to TranslationOS
At this point, the added users need to log in to TranslationOS using their Okta email address to trigger the creation of various records on our end so that we can configure permissions and automatic permission assignment rules.
Microsoft Entra (Azure)
Create a new app
-
Click Create a new application.
-
Give the app a name, e.g. TranslationOS.
-
Select Integrate any other application you don’t find in the gallery (Non-gallery).
-
Click Create. It will take a few seconds to be completed.
Edit Basic SAML Configuration
-
In the Overview screen, choose Single sign-on in the sidebar.
-
Select SAML.
-
Click Edit alongside Basic SAML Configuration.
-
Click Add identifier under Identifier (Entity ID).
-
Insert one of the following, depending on the environment being configured:
-
Sandbox:
urn:amazon:cognito:sp:eu-central-1_T7VmNf7NL -
Production:
urn:amazon:cognito:sp:eu-central-1_kQEOSHc18
-
-
Click Add reply URL under Reply URL (Assertion Consumer Service URL).
-
Insert one of the following, depending on the environment being configured:
-
Sandbox:
https://sandbox-temp-url.auth.eu-central-1.amazoncognito.com/saml2/idpresponse -
Production:
https://production-temp-url.auth.eu-central-1.amazoncognito.com/saml2/idpresponse
-
-
Click Save.
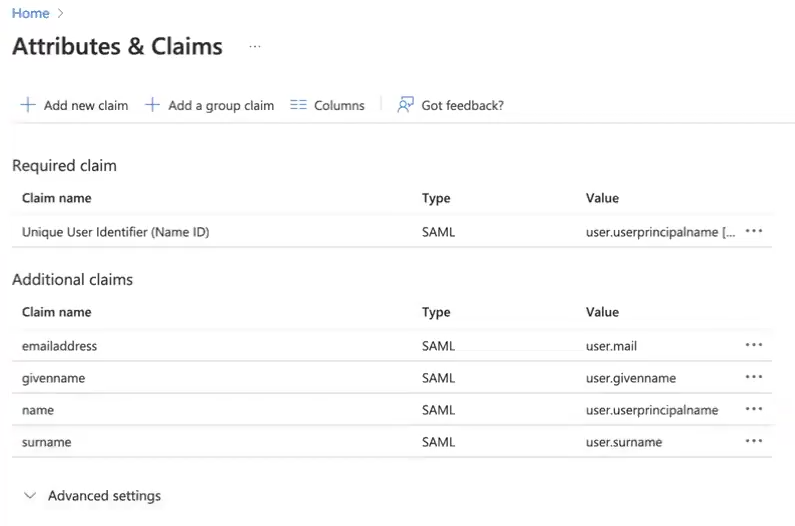
Configure Attributes & Claims
-
For each claim:
-
Click on the row.
-
Empty the namespace field.
-
Click Save.
-
-
Take a screenshot of the Attributes & Claims view.
Get the App Federation Metadata URL
-
Go to the SAML Certificates section.
-
Copy the App Federation Metadata Url.
Send information to Translated
Send the following to Translated:
-
The screenshot of the Attributes & Claims view.
-
The App Federation Metadata Url.
We will do some configuration on our end, then let you know when you can continue.
Enable the app for your users
-
In the sidebar, choose Users and groups.
-
Click Add user/group.
-
Proceed as appropriate.
Log in to TranslationOS
At this point, the added users need to log in to TranslationOS using their Okta email address to trigger the creation of various records on our end so that we can configure permissions and automatic permission assignment rules.
FAQ
When I try to access TranslationOS from my app list, it doesn’t work
TranslationOS SSO authentication can’t be initiated by the identity provider (IdP), i.e. by selecting the app in the list provided on the authentication platform. To log in to TranslationOS, you must visit it directly and log in from there.